
How to Build an AI Study Guide From Your Course Files
Build an AI study guide from your course files that holds up: a source inventory, copyable prompts, a worked coverage matrix and repair of missing topics.
Contents (14 sections)
To build a useful AI study guide from your course files, do not upload everything and ask for "a summary". List your sources, build a topic map from the syllabus, generate a draft that keeps a slide or page reference for every claim, then check coverage topic by topic and repair only what is missing. The check is the part most guides skip, and it is where AI study guides usually fail: the text reads well, but a slide with an examinable exception never made it in.
In short
- Make a source inventory and add the syllabus as its own source: it defines scope, not content.
- Organise the guide around what the exam asks you to do (define, compare, calculate, apply), not around file order.
- Keep a source anchor (slide, page, timestamp) next to every definition, number and formula.
- Audit coverage with a four-check matrix, then regenerate only the rows that fail.
- Turn each weak topic into three retrieval questions. A guide you only reread is the weakest way to use it.
Still choosing a tool? Our AI study assistant guide has a one-chapter test for that. This article assumes you have picked one and want the output to hold up on exam day.
Why "upload everything and summarise" fails
A typical module folder holds twelve lecture decks, two textbook chapters, a spreadsheet of lab values and a recording or two. Upload all of it with one prompt and you get something long and fluent. What you do not get is proof that it covers what the exam can ask. Three things go wrong again and again:
- Silent omissions. A model condensing many files has to drop something. It tends to drop short slides, tables and exceptions, which are exactly what exam questions love.
- Blended conflicts. Lecture 8 defines a term one way, the textbook another. The draft merges them into one smooth sentence that matches neither.
- File order as structure. The guide follows lecture 1, 2, 3 instead of the questions you will be asked, so it helps with reading but not with answering.
None of this means AI is useless here. It means generation is the first pass, and the checking is on you.
Step 1: build a source inventory
Create a small table with one row per source. Five columns are enough: name, type, lecture number or date, expected topics, and exam relevance (high, medium, low). Add the syllabus and any "what's on the exam" email from the lecturer as separate rows, because they define scope.
Then flag two things by hand. First, conflicts: if two sources disagree, write it down so the guide keeps both versions instead of averaging them. Second, emphasis: for recordings, note timestamps where the lecturer said "this comes up every year". Ten minutes here saves an hour of correcting later.
What each file type needs before you upload it
| File type | Typical problem | What to do first |
|---|---|---|
| Lecture slides (PDF, PPTX) | Bullet fragments without the spoken explanation | Pair each deck with its recording or your own notes for that lecture |
| Scanned handouts | OCR errors in numbers, units and drug names | Spot-check five numbers against the scan before trusting the text |
| Recordings (audio, video, YouTube) | Misheard technical terms, long tangents | Skim the transcript for key terms; note timestamps of stressed points |
| Spreadsheets (XLSX, CSV) | Formulas and units lost, only values survive | Add a line explaining what each column means and its unit |
| Textbook chapters | Much wider than your syllabus | Upload only the chapters the syllabus names, and label them as reference |
| Diagrams and images | The model describes them loosely or skips them | List important figures in the inventory so you can check they appear |
Step 2: organise around what the exam asks you to do
Build the topic map from the syllabus, then decide the "shape" of each topic from the exam format. A law student organises by rule, exception and application. A medical student often uses definition, mechanism, clinical picture, tests and management. An engineering student may use assumptions, model, derivation and failure conditions.
Give every topic a stable label and reuse it everywhere: in the guide, the flashcards, the quiz and your oral practice. Stable labels are what later let you see that "Bayes theorem" has a summary and six cards but no applied question, while "sampling bias" sits in the syllabus and in no generated material at all.
Step 3: generate a draft with source anchors
Ask for the topic map first and the full guide second. A long first output tends to become the structure by default, even when it is the wrong one. These are the prompts I use; adapt the bracketed parts:
Prompt 1, topic map: "Using only the attached sources, build a topic map for [course] that follows this syllabus: [paste syllabus headings]. For each topic list the sources that cover it, with slide or page numbers. Flag any topic with no source and any place where two sources disagree. Do not write explanations yet."
Prompt 2, one topic at a time: "Write the study-guide section for [topic label]. Structure: [definition / mechanism / example / common exam trap]. After every definition, number or formula add the source in brackets, e.g. (L7 slide 12). If the sources do not say something, write 'not in sources' instead of filling the gap."
Prompt 3, coverage audit: "Compare this study guide with the syllabus list below. For each syllabus item answer: covered / partly covered / missing, and quote the source location that should have been used."
The "not in sources" instruction matters more than it looks. It turns a confident guess into a visible gap you can fix.
Step 4: run a coverage matrix
Use the syllabus topics as rows. For each row, run four checks:
- Present: does the guide address the topic at all?
- Supported: can you point to at least one source location for it?
- Usable: does it support the task the exam sets (a calculation, a comparison, a case)?
- Practised: is there at least one retrieval question or application task for it?
Worked example: a renal physiology module
Example Here is what the matrix looked like for a six-topic excerpt of a renal physiology module after the first draft:
| Syllabus topic | Present | Supported | Usable | Practised | Action |
|---|---|---|---|---|---|
| Glomerular filtration and GFR | Yes | Yes (L3) | Yes | Yes | None |
| Renal clearance | Yes | Yes (L4) | No: definition only, no calculation | No | Regenerate with the worked examples from L4 |
| Tubular transport by segment | Yes | Partly: lab table missing | Yes | No | Add the spreadsheet as a source, create cards |
| Countercurrent multiplier | Yes | Yes (L6) | Yes | Yes | None |
| ADH and aldosterone | Yes | Conflict: L6 vs textbook | Yes | No | Keep both versions, ask the lecturer |
| Acid-base compensation | No | - | - | - | Regenerate from L8 recording (min 12-31) |
Two points from this example. "Present" alone would have scored five out of six and hidden the real problem with clearance, where a two-sentence description is useless for a calculation question. And the missing topic was in a recording, the file type most often under-used when many sources are merged.
Step 5: repair the failed rows only
When a row fails, select just the sources for that topic and regenerate that one section. Do not rebuild the whole guide unless the topic map itself was wrong. Selective repair is faster, and it avoids a common trap: a full regeneration fixes one gap and quietly introduces two new ones elsewhere.
Copy this coverage matrix
Paste the table into a spreadsheet or your notes app, one row per syllabus topic. Fill it after each draft, not once at the end: the "Action" column is your repair queue for the next session.
| Syllabus topic (stable label) | Present | Supported (source anchor) | Usable for the exam task | Practised (question written) | Action |
|---|---|---|---|---|---|
| [topic 1] | Yes / No | [L3 slide 12, p. 45] | Yes / No: [why] | Yes / No | [none / regenerate / add source / ask lecturer] |
| [topic 2] | |||||
| [topic 3] |
Each failed check has a different fix. Regenerating the whole guide is almost never one of them:
| Check that failed | Most likely cause | Fix |
|---|---|---|
| Present | The source was never uploaded, or it was a recording or scan that extracted badly | Add or re-export the source, then regenerate that one topic from it |
| Supported | The model filled a gap from general knowledge | Ask for the anchor; if none exists, mark "not in sources" and check the textbook yourself |
| Usable | Definition only, while the exam asks for a calculation, comparison or case | Regenerate with the worked examples from the lecture and name the exam task in the prompt |
| Practised | No questions yet | Write three retrieval prompts (step 6), or turn the repaired section into flashcards and prune AI-drafted flashcards before studying them |
Step 6: turn each topic into active practice
Coverage is a content check. Learning needs retrieval. In the review by Dunlosky and colleagues (2013), practice testing and distributed practice were the only two techniques rated high utility, while rereading, highlighting and summarisation were rated low. Roediger and Karpicke (2006) found that testing beat restudying on delayed tests, even though students who restudied felt more confident.
So for each important topic write three prompts: a short recall question, an application question, and "explain the exception". Answer before looking, check against the anchor, and write one corrective sentence. Then space those attempts over the days before the exam; our spaced repetition schedule guide shows how to fit them into a calendar.
What a finished study guide should contain
For each topic, aim for one screen, not five pages:
- One-line answer: what you would say first if asked about it.
- Core explanation: the mechanism, rule or derivation, with source anchors.
- Must-know list: 3-5 facts, numbers or steps that are examinable on their own.
- Common trap: the confusion or exception the exam likes to test.
- Practice: the three retrieval prompts from step 6.
A 45-minute session for one module
- Minutes 0-8: update the source inventory and syllabus topics.
- Minutes 8-15: build or check the topic map (prompt 1).
- Minutes 15-25: generate the draft sections with anchors (prompt 2).
- Minutes 25-32: run the coverage matrix (prompt 3 plus your own check).
- Minutes 32-40: repair the two highest-risk rows.
- Minutes 40-45: answer three retrieval questions without notes.
The deliverable is not "a summary". It is a list of covered topics, the evidence for each, and a short queue of weak spots to practise next.
What source anchors look like in practice
Anchors are easier to demand once you have seen them. In the screenshot below every summary point ends with the slide range, page or audio timestamp it came from, and the left column shows a per-topic coverage count. Those are the two things steps 3 and 4 ask you to check by hand in any tool.
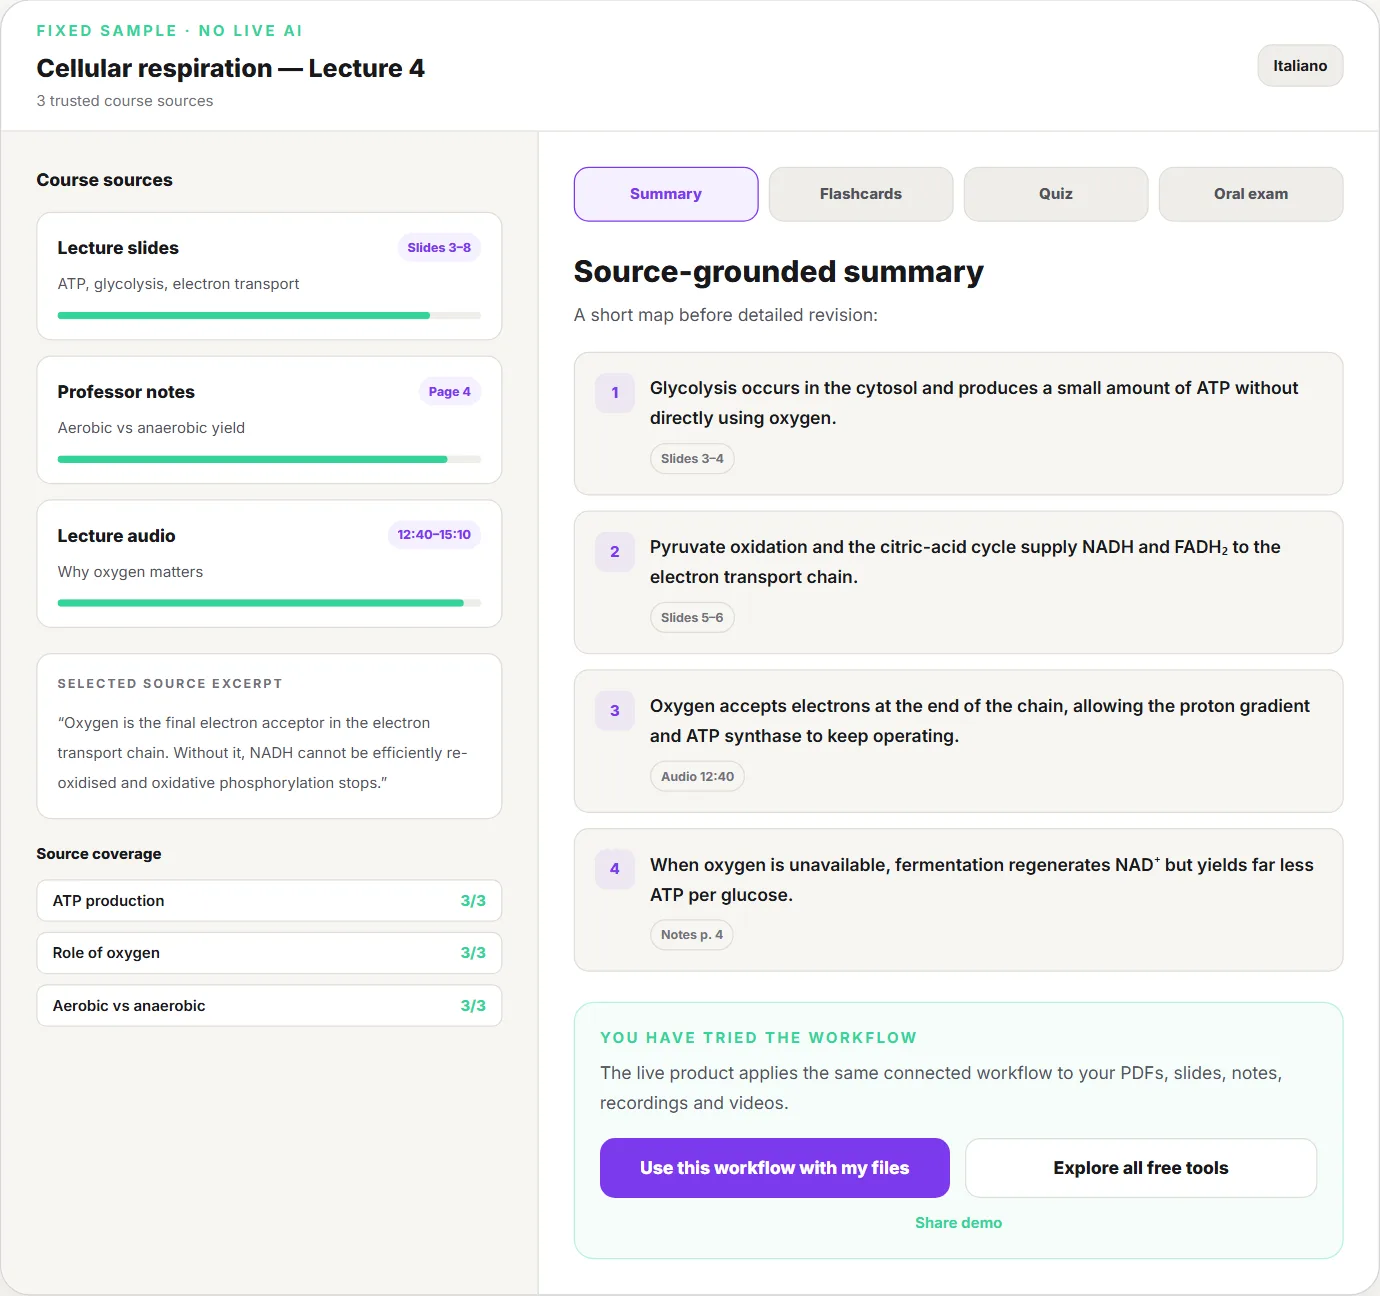
You can open the same sample notebook and click through the summary, flashcards, quiz and oral tabs. It is a fixed example, so nothing you type is sent to an AI model.
Doing this in Memoniq
Memoniq is built around this loop. Mixed files (PDF, slides, Word, spreadsheets, audio, video, YouTube lectures, images) sit in one notebook; the summary, flashcards, quizzes, mind map, lessons and oral practice all reuse that source set; and a coverage check lists missing topics per source so you can generate only the ones you select. Sources per notebook are capped by plan (5 on Free, 15 on Student) because merged output gets less coherent as the pile grows.
If a weak topic has to be explained aloud, continue with how to prepare for an oral exam. If you are still comparing source-grounded tools, see the NotebookLM alternative comparison. Flashcards from the same files? PDF to flashcards covers that step.
When not to trust the workflow
Do not treat a generated guide as the final authority for clinical, legal, safety-critical or fast-changing facts; check them against current primary sources or official guidance. Poor scans, ambiguous diagrams, spreadsheets without units and noisy recordings need extra review. And a coverage check only evaluates the files you supplied: it cannot find the lecture you forgot to upload.
Sources and further reading
- Dunlosky et al. (2013), Improving Students' Learning With Effective Learning Techniques
- Roediger & Karpicke (2006), Test-enhanced learning
- Karpicke & Blunt (2011), Retrieval practice produces more learning than elaborative studying with concept mapping
- Cepeda et al. (2006), Distributed practice in verbal recall tasks
Frequently asked questions
Can AI combine PDFs, slides and recordings into one study guide?
Yes, but combining files is only the first step. Use a source inventory, stable topic labels and a coverage matrix to catch omissions and conflicts between sources.
How do I check whether an AI study guide covered the syllabus?
Use every syllabus topic as a row and check whether it is present, supported by a source location, usable for the exam format and practised with a retrieval question.
What prompt should I use to make a study guide from lecture notes?
Ask for a topic map that follows your syllabus first, then write one topic at a time with a source reference after every definition, number and formula, and 'not in sources' where the files say nothing.
Should I regenerate the whole guide when something is missing?
Usually not. Select only the sources for the missing topic and regenerate that section, unless the overall structure is wrong.
How many files can I upload at once?
It depends on the tool. NotebookLM's free plan allows 50 sources per notebook; Memoniq allows 5 on Free and 15 on Student, because merged output gets less coherent as the pile grows.
Are AI study guides accurate?
They can be, but errors cluster in numbers, units, names and exceptions. Keep a source anchor next to each of these and spot-check them against the original.
What should I do when a topic fails the coverage check?
Fix the specific check that failed: add or re-export the missing source, ask for the source anchor or mark it as not in sources, regenerate with worked examples when the section is not usable for the exam task, and write three retrieval questions when it has not been practised. Regenerate only that topic.
How long should a study guide be?
Aim for about one screen per topic: a one-line answer, the core explanation, three to five must-know points, the common trap and three practice questions.
Keep reading
How to Study for In-House Exams in Medical School
In-house exams are written from your lectures. A per-lecture workflow, an AnKing decision tree, a sample lecture-day schedule and how pass/fail changes the balance.
How to Make Anki Cards From Lecture Slides with AI (Without a Bloated Deck)
AI drafts, you prune: a worked example on one slide, a neutral guide to tool types, CSV vs .apkg, image occlusion, cards per lecture and how to combine with AnKing.
How to Prepare for a Medical Viva Exam: Structures, Questions and a 4-Week Plan
An answer ladder you can say out loud, 16 classic viva questions with outline answers, a four-week plan, a five-criterion rubric and a safe way to practise with an AI examiner.
Roberto Coscia
Nursing graduate (BSc) · Founder of Memoniq
Sources are cited and checked at the end of the article. Medical content is educational: always verify against your course material. About the author · Editorial policy
Last updated: September 25, 2026